|
|
For
participants only. Not for public distribution.
|
 |
Note #50
John Nagle |
The new steering control system.
We've been using OpenSteer for steering control, but the integration problems with the rest of the Overbot software have led to a rewrite. Hence, "newsteer".
Basic approach
The basic concept of "newsteer" is that there is a moving "goal point", which the vehicle chases. The goal point is moved so as to stay within the waypoint boundaries and avoid obstacles. A vehicle-width curved wedge between the vehicle's current position and the goal point must be passable at all times.
The distance between the vehicle and the goal point is the "move distance" we use in the move server. Thus, the closer the goal point is to the vehicle, the slower the vehicle will go. Also, the closer the goal point is to the vehicle, the less uncertainty there is about where the vehicle will be when it passes the goal point.
Once we have a goal point, the vehicle steers toward it in a circular arc. The arc is tangent to the direction the vehicle is going and goes through the goal point. Thus, the curvature (1/radius) of the arc is the curvature we send to the move server as a steering command.
We have a simple waypoint follower working now, using this approach. Next is obstacle avoidance.
Steering around obstacles
First, "obstacle" here simply means "impassable cell(s) in the terrain map", which is a large grid of cells 20 cm. square. We have no notion of obstacles as "objects". The terrain map and its updates are documented in note 35..
 |
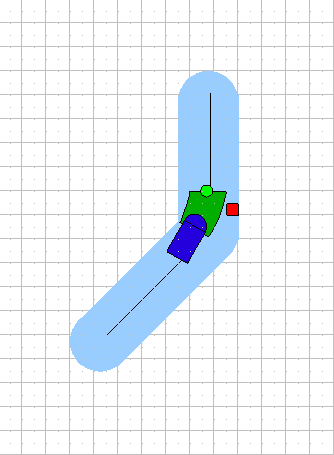
Approaching a turn on a narrow waypoint segment. The vehicle is the dark blue object. The light green circle is the goal point, and the dark green wedge is the area that must be clear for the vehicle to advance. This is the easy case. But note the red square, an obstacle just beyond the turn. This represents an impassable area in the map constructed from LIDAR and radar data. |
 |
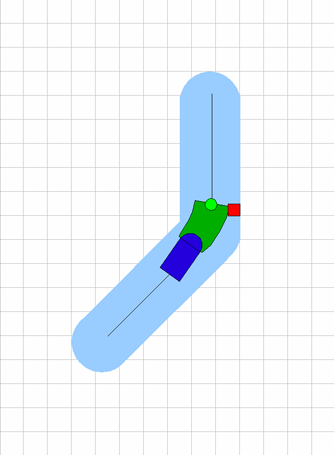
Getting past the obstacle. The steering program must find a curved wedge that will fit. Notice that the wedge has been shortened; if it were the original length, it would have been too wide and wouldn't have fit. This forces us to slow down, since we must always be able to stop before the goal point. |
The curved wedge test
 |
Curved wedge test The basic primitive of obstacle avoidance is the curved wedge test. This evaluates a curved wedge for traversability. The curved wedge test works outward from the narrow (vehicle) end of the wedge out to the requested distance. It reports the first "impingement" on each side of the centerline. Each "impingement" is reported with a distance and a centerline curvature which would clear that impingement If the wedge touches a waypoint boundary, that too is reported. This keeps us from curving off course. The curved wedge test also stops when it reaches an area marked as "unknown", not yet seen by the sensors. This is distinguished from an "impingement". An impingement we must steer around. An unknown area can be approached. The obstacle avoidance form of this test simply accepts only green (flat) terrain. It's pure geometry. The terrain evaluation form of the test looks at the elevation and roughness data stored in each cell, and evaluates whether a vehicle-sized rectangle can be passed over the wedge along its center arc without exceeding the allowed tilt and roughness limits. In general, we will drive on "green" terrain if possible, and will use the terrain evaluator only when necessary. |
Using the "curved wedge test", path generation is straightforward. The "ideal path", along the centerline, is tested first. If it works, we go with that. If there's a problem, the curved wedge test tells us what curvature to try next to get around the obstacle on either side. Unless the path is completely obstructed in the area in front of the vehicle, some combination of curvature and goal distance should move us forward.
If we can't find a usable path using only the obstacle avoidance curved wedge test, we have to use the terrain evaluation form of the test. This is somewhat more complex, but uses the same general concept of working forward along the centerline. It will accept hilly, bumpy terrain, as long as it is not too hilly or bumpy. The terrain evaluator returns a "goodness value", so that the least bumpy segment will be picked. A goodness value of zero indicates that the terrain should not be driven over.
If this doesn't work, we have to stop and use the repositioning planner, which has access to the map and the curved wedge test.
Implementing the curved wedge test
The curved wedge test needs to be implemented efficiently, since we'll be using it inside a search loop. Since it scans across a group of cells, it's much like a graphics fill algorithm. However, we want to scan arc by arc, or line by line, working outward from the starting point, so we find the first obstacle. So scan-line type polygon fill algorithms are not suitable.
It's OK to look at the same cell twice, so we don't have to do the bookkeeping to avoid that. This simplifies the problem.
So all we have to do is to start at the base of the curved wedge on the outside curve, and work along the curved edge one cell at a time. For each cell, we must scan across the cells, perpendicular to the centerline, until the inside curve is reached. We start with the outside curve because this insures that each cell will be examined at least once.
Moving along a curved arc can be done efficiently with the arc variant of Bresenham's line drawing algorithm. And, of course, moving along a line requires only the classic Bresenham algorithm.
So this can be implemented quite efficiently.
Steering strategy
What's been described so far is pure geometry. But this approach doesn't force us to specific steering decisions. There's some flexibility.
That flexibility is exercised by positioning the goal point at one of the multiple valid positions where it could be placed. Here's an example where we need to use that flexibility.
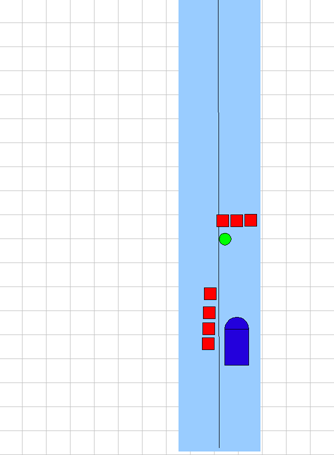 |
Turn speed trap This is a trap. If we approach too fast, we won't be able to turn out of it. |
If we place the goal point out as far as we can, and go as fast as we can given our stopping distance, we'll be going too fast to make the turn. Our curvature limit vs. speed check will prevent the turn, and we'll end up stopped in front of the obstacle.
In tight spots, we may want to position the goal point closer than the next obstacle visible. The minimum distance to which we would have to pull in the goal point is determined by the maximum speed safe speed at which we can turn at the tightest curvature of which the vehicle is capable.
A reasonable heuristic is that if we currently have very little path flexibility because of obstacles of the side, we should place the goal point close to the vehicle. In less cluttered terrain, we can move the goal point out. This is very roughly what human drivers seem to do.
This is a safe heuristic. Whatever we do here won't cause a crash. It may keep us from getting blocked by an obstacle, at some cost in forward speed.
Once we have the repositioning planner working, this decision become easier, because if we get it wrong, we can back up and try again, with a shorter goal point distance and thus a slower speed
Tight turns
 |
A better way around the turn Merely following the centerline through a turn does not work for turns greater than 90 degrees. For less sharp turns, going outside the centerline is often desirable, because it reduces the turning curvature needed. |
The goal point sometimes needs to move outside the centerline.
The turn arc shown is constructed as follows.
- It is tangent to the centerline of the exit waypoint segment at the turn endpoint, and starts at that point.
- Its curvature is ideally the tightest allowed curvature for the current speed of the vehicle, the tightest the vehicle can turn at the current speed. But it is never tighter than the radius of the centerline of the turn. (Otherwise, it would not reach the centerline of the previous segment.
- The arc ends when it intersects the centerline of the previous segment.
- The arc is tested with the curved wedge test, starting from the turn endpoint and looking backwards. The arc is tightened if necessary to clear the outside of the turn.
The goal point then follows the centerline until it reaches the arc, then follows the arc to the turn endpoint.
Problems:
- Does the arc continue to change while being followed?
- How far ahead must the goal point be to avoid jerk when the goal point starts to follow the arc?
- Arguably, the right answer here requires a spline, not an arc. Is an arc good enough?
Gaze management
Our LIDAR scanner is tiltable, and we must decide where to point it. If a curved wedge test along the current line of travel is stopped by an unknown area,. that tells us where the LIDAR has to be pointed. Thus, any gap in the data in an area where we need it will result in pointing the LIDAR at the place needed to fill in the gap. So we can use the curved wedge test for LIDAR control, too.
Strengths and weaknesses
This is a reactive controller which works against a map. It has the basic strengths and weaknesses of reactive planners: it's simple and fast, but can't solve "puzzles", where it's necessary to plan more than one move ahead. This is reasonable for the DARPA Grand Challenge, for which most of the route is relatively well-defined. Elaborate obstacle avoidance may be needed, but not too often. And we can't see far enough ahead to make elaborate plans, anyway.
The "repositioning planner" has to be able to get us out of turns too tight to make in one move, simple dead ends, and other "puzzle" like situations. But it doesn't have to be fast. When we use it, we will stop, use the tilt head to build up as clear a picture of the surrounding area as we can (we can get really good scan quality when stopped), make a plan, and create some dummy waypoints for the lower-level system to follow.
Summary
This isn't too hard to implement, and it should work. It already follows waypoints with the real vehicle. So we're not that far away.